ODBC
Host-based Logging
Enabling the Logging Button
Host-based logging is set up by clicking on a Logging button on the RealSQL Setup dialog box. By default, this button is hidden, as it is not required during normal operation of Reality SQL/ODBC. It must therefore be displayed in order to set up and enable logging.
Caution
Setting up of logging will affect the performance of the SQL/ODBC interface and may consume large amounts of disk space. These facilities should only be enabled for troubleshooting purposes by Support personnel.
To show the Logging button, remove the comment character (;) from in front of
the HostLogging=1 entry in the realsql.ini file, located in the
Windows directory.
Note: You can edit realsql.ini with a text editor such as Notepad. On Windows Vista, you should always run your editor as an administrator. If you run it as a normal user, you will be unable to save your changes.
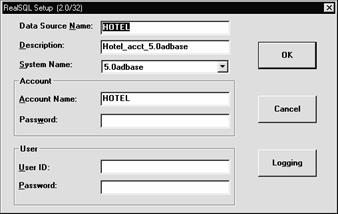
Having removed the semicolon and saved realsql.ini, run the ODBC Administrator, select the appropriate Reality data source and click the Setup button. The Logging button is now displayed on the RealSQL Setup box as shown below.
Enabling Logging
The following procedure is used to set up logging of ODBC commands between the RealSQL driver on the PC and the SQL server on the host.
On the RealSQL Setup dialog box, click the Logging button:
The following dialog box is displayed:
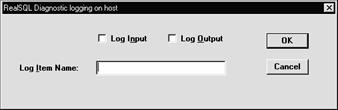
The check boxes and text field in the above dialog box can be filled as follows:
Log Input Select this check box to enable logging of commands to the SQL server.
Log Output Select this check box to enable logging of responses from the SQL server.
Log Item Name:
Enter the id of the item in the file to which commands are to be logged. If
you leave this box empty, the default is a numeric item id, one for each
connection. It is recommended that you use the default.
ODBC Client-based Logging
Logging ODBC Calls using MS ODBC 3 Tools
When using Microsoft ODBC 3 tools, the following procedure is used to set up logging of ODBC commands to the RealSQL driver from the client application.
- Select the 32-bit ODBC admin icon from the Windows Control Panel. Alternatively, run WinSQLM and select the Administration button on the RealSQLM Connect dialog box. In either case the ODBC Data Source Administrator dialog is displayed.
On the ODBC Data Source Administrator dialog box, click the Tracing tab. This displays the Tracing panel, shown below.
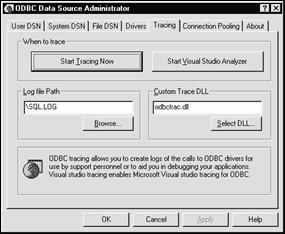
- To start logging, click Start Tracing Now. The default log file is SQL.LOG as shown on the Log file Path box. The location of the log file can be changed using the Browse option.
Logging ODBC Calls using MS ODBC 2 Tools
When using Microsoft ODBC 2 level tools, the following procedure is used to set up logging of ODBC commands to the RealSQL driver from the client application.
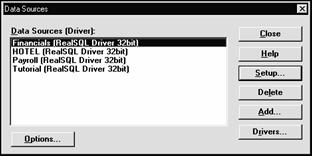
When setting up a data source, select the Options button on the Data Sources box, after highlighting the data source that is to be traced:
The following screen is then displayed:
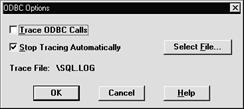
The default log file is SQL.LOG as shown on the ODBC Options box. The location of the log file can be changed by selecting the Select File option.
PCSNI Logging
On PCSNI 2.2 or later, to set up command logging, enable debugging as described in Debug Options in the section PCi Standard Network Interface: