Configuration
This topic describes how to configure your PC to use PCSNI.
Creating a Configuration File
To connect using PCSNI you will require a configuration file called WINSNI.INI in your Windows directory, containing the details of the hosts to which you will connect. You can create this using the WinSNI Configuration Editor (the installation procedure creates a menu item for this on your Start | Programs menu).
Notes:
- When you install PCSNI, an example configuration file is created.
- If you have upgraded from PCSNI version 2.0 or earlier, you will need to copy the host entries from your PC Route File (PCSNI.INI) into WINSNI.INI. This can be done by running the program MKWINSNI.EXE (supplied on the CD).
- If you are using a Windows Vista host that is shared by a number of users, you should always run the WinSNI Configuration Editor as an administrator. If you run it as a normal user, any changes you make will be local to that user.
- You can also edit WINSNI.INI with a text editor such as Notepad. On Windows Vista, you should always run your editor as an administrator. If you run it as a normal user, you will be unable to save your changes.
When you start the configuration editor, you will see the following dialog:
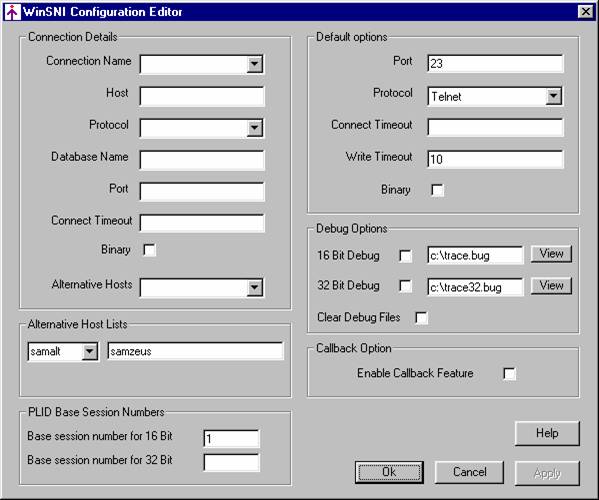
Default Options
Port This setting specifies the port to be used on hosts that do not have a Port setting, or do not have a configuration entry. It must be set to the number (in decimal) of the host service port to be used. For DDA connections, this is normally port 1203, while for Telnet connections it is normally port 23.
Protocol This setting specifies the protocol to be used for hosts that do not have a Protocol setting, or that do not have a configuration entry. It must have one of the following values:
DDATCP This must be used for TCP/IP connections to Northgate hosts running applications that use the DDA protocol. In general, you should use DDATCP when connecting to Reality or RealityX.
Telnet This can be used for connection to any host that is capable of running the Telnet daemon(telnetd).
Note: It is recommended that you set your default protocol to Telnet and your default port to 23. You will then be able to connect to any host that can be resolved by TCP/IP, even if that host does not appear in your configuration file.
Connect Timeout (DDA connections only)
The time in minutes for which PCSNI will wait for a connection to be accepted
before giving up. The default value is 2.
Write Timeout This specifies the timeout period in seconds to use when writing data to a host that is busy. If no write timeout is specified the default is 10 seconds.
Binary Specifies the default data format used for Telnet connections. If this option is not selected, non-binary data format is used.
Connection Details
You will need an entry in the Connection Details section for each host to which you connect:
To add a new connection, type a name for the connection in the Connection Name field. Then complete the remaining fields in the Connection Details section (see the field descriptions below).
To base the new connection on an existing one, first select the required entry from the Connection Name drop-down. When you type the name of the new entry, the other fields will initially contain the settings for the previously selected entry.
- To edit an existing entry, select the required entry from the Connection Name drop-down. Then change any of the fields in the Connection Details section (see the field descriptions below).
- To delete an existing entry, select the required entry from the Connection Name drop-down and then click the Delete Entry button.
The Connection Details section contains the following fields:
Connection Name
The connection name is the name which you will use when making a connection.
This can be either of the following:
- The host name specified in your TCP/IP hosts file, Domain Name Service or Network Information Service (depending on your TCP/IP configuration).
- A local alias for the remote host.
Note that you can set up several different aliases for the same remote host. This allows different configurations to be set up to suit particular tasks. For example, if you have a host that provides Telex and Electronic Mail facilities, you could set up two aliases for this host, Telex and EMail. Users wishing to send a telex would then connect to Telex and those wishing to use the mail facility to EMail, though both would in fact be connecting to the same host.
Host This setting is only required if the host name is a local alias. Its value can be either:
- A host name, as specified in your TCP/IP hosts file, Domain Name Service or Network Information Service (depending on your TCP/IP configuration).
- An IP address of up to twelve digits (plus any separators).
If this entry is omitted, the host name specified in the section heading is used.
Protocol This setting must have one of the following values:
DDATCP This must be used for TCP/IP connections to Northgate hosts running applications that use the DDA protocol. In general, you should use DDATCP when connecting to Reality or RealityX.
Telnet This can be used for connection to any host that is capable of running the Telnet daemon (telnetd).
If this setting is omitted, the Protocol setting in the Default options section is used.
Database name This setting can be used for the following:
- For connections to a Reality or RealityX database or SovereignX environment.
To “replug” a DDA connection; that is, to connect to one host via another, gateway, host. This is only necessary when the PC and the destination host do not have a common protocol they can use (for example, between a PC and a Northgate Series 19 system), or when the destination host is on a separate LAN.
Note: A replug is only possible over DDA circuits. To use this feature, you must select the DDATCP protocol (see above).
The Database name entry must be set to the name of a Destination, Q-Type, RealityX or SovereignX entry in the gateway host's Route File (refer to UNIX-Connect System Administration for details).
Port This must be set to the number (in decimal) of the host service port to be used. For DDA connections, this is normally port 1203, while for Telnet connections it is normally port 23.
If this setting is omitted, the Port setting in the Default Options section is used.
Connect Timeout (DDA connections only)
The time in minutes for which PCSNI will wait for a connection to be
accepted before giving up. The default value is 2.
Binary Specifies the data format used for Telnet connections. If this option is not selected, non-binary data format is used.
Alternative Hosts This setting is only required if you want to try one or more alternative hosts, should your initial connection fail. Select the required alternative host list from the drop down.
Alternative Hosts
An alternative host list specifies the alternative hosts to try, should the initial connection fail. To use one of these lists, specify the name of the required list as the Alternative Hosts setting for the host concerned.
- To create a new list, select {New List} from the drop down and then type the names of the required alternative hosts, separated by commas. List the host names in the order in which they are to be tried. To save your new list, click the Save New List button.
- To edit a list, select the list name from the drop down and then change the list as required.
- To delete a list, select the list name from the drop down and then delete the list from the text box.
Debug Options
16 Bit Debug
32 Bit Debug These options allow you to save debug information to a file for later
analysis. To enable debugging, select the appropriate option and enter the full
path of the file into which the debug information will be saved. To view
previously saved debug information, click the appropriate View button.
Note: By default, the debug files are created in the root folder on drive C. On Windows Vista these files cannot be created in this folder and you must change the locations to specify a folder that is accessible to normal users.
Clear Debug Files
Select this option to clear the debug files and start afresh.
Callback Option
Enable Callback Feature
By default, connections are polled to find out whether
data is available. If this option is selected, the TCP
socket will instead inform PCSNI when incoming data is available. This reduces
CPU usage, and thus improves the performance of other PC applications.
It is only necessary to select this option if you are connecting from 16-bit applications such as RealLink for Windows. Note also that EnableCallback must only be used if all connections will use TCP/IP – if any connections will use an asynchronous port, it must be omitted or set to 0.
PLId Base Session Numbers
Base Session Number for 16 Bit
Base Session Number for 32 Bit
These options allow you to control the session numbers used for 16- and
32-bit connections, to prevent them both using the same numbers. To use this
option, enter different base session numbers, separated by at least 10; for
example, if you have set 16-bit to 1, set 32-bit to at least 11.
Example
The following example shows a typical configuration.
Default Options
Protocol Telnet
Port 23
ACCOUNTS connection
Protocol DDATCP
Port 1203
Because in this example the default protocol is Telnet, for a DDA connection you need to specify the protocol and the port number.
PAYROLL connection
Protocol DDATCP
Host ACCOUNTS
Port 1203
This connection uses an alias as the host name, and therefore specifies the network name of the host. In this case, when you connect to PAYROLL, you in fact connect to the host ACCOUNTS. The other settings are the same as for the ACCOUNTS host.
TRANSPORT connection
This is a Telnet connection and all the settings have therefore been specified in the [OPTIONS] section; you therefore only need to specify the connection name. Note, however, that you only need entries for TCP/IP hosts that use the default protocol if any of the connection parameters need to be changed.
SALES connection
Host ACCOUNTS
Protocol DDATCP
Port 1203
DBase SALES
This is a network replug. You must specify the name of the gateway host and the name of the appropriate ROUTE-FILE entry on that host. In this case, the gateway host is ACCOUNTS and the protocol is DDATCP. Since the default protocol is Telnet, you also need to specify the correct port number.