Setting-up the SQL/ODBC Software on a PC
To set up the ODBC PC connection to the host, you must:
- Install the SNI software on the PC as described in the Reality External Components Installation Guide, and configure it to provide connections to the hosts and databases you require. See the topic Configuring the Standard Network Interface below and the PCi Standard Network Interface.
- Install the RealSQL-ODBC Driver. For details, refer to the appropriate sections of the Reality External Components Installation Guide.
- Set up the SQL/ODBC Data Source. See the topic Setting Up the SQL/ODBC Data Source - this configures the Windows Registry.
Configuring the Standard Network Interface
You configure the SNI software with the WinSNI Configuration Editor as described in Creating a Configuration File in the section PCi Standard Network Interface. SQL/ODBC entries must be set up as follows:
- The protocol must be set to DDATCP.
- The port must be set to 1203.
- The entry must contain a DBase setting containing the name of a database entry in the ROUTE-FILE (UNIX) or Registry (Windows) on the host.
Setting-up the SQL/ODBC Data Source
An ODBC data source stores information about how to connect to the indicated data provider.
Note
It is assumed throughout this section that the user has sufficient system privileges to perform these operations.
To add a data source to an ODBC compliant application, start by selecting the 32-bit ODBC administration icon from the Control Panel. Note that on Windows 2000, Server 2003 and XP, the ODBC icon is in the Control Panel?s Administrative Tools group ? when in Category view on Windows Server 2003 or XP, this is under Performance and Maintenance.
Notes
- The ODBC admin icons have different names on different versions of Windows. Check that you have selected the correct icon.
- On 64-bit versions of Windows, you can use both 32- and 64-bit data sources. To configure Reality ODBC data sources (32-bit) run the utility %windir%\syswow64\odbcad32.exe.
The dialog that follows depends on whether ODBC 2 or ODBC 3 components are installed on your PC. ODBC 2 is installed with SQL/ODBC for Reality. However, if you have installed other ODBC 3 applications on your PC, ODBC 3 overwrites the ODBC 2 components.
If, when you run the ODBC administration tool, you see a dialog titled ODBC Data Source Administrator, you are using the ODBC 3 administration tools — continue with Procedure using ODBC 3 Tools.
Otherwise, continue with Procedure using ODBC 2 Tools.
Procedure using ODBC 3 Tools
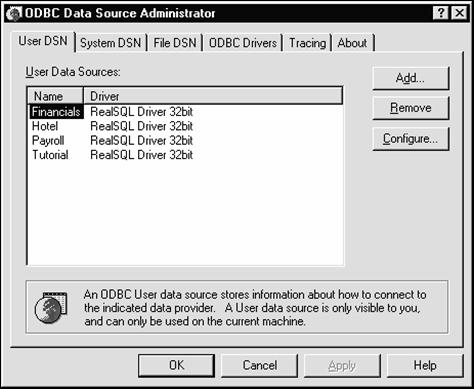
To add a 32-bit Data DSN (Data Source Name), after selecting the 32-bit Admin icon, the following screen is displayed:
-
Select the appropriate tab to create a User, System or File DSN:
- A User data source is only visible to you, and can only be used on the current machine.
- A System data source is visible to all users on the machine.
- A File data source can be shared by users who have the same drivers installed. The configuration data for a File data source is stored in a file on the PC, rather than in the registry. It is not recommended that you use File data sources.
-
Click the Add button. This displays a dialog similar to the following:
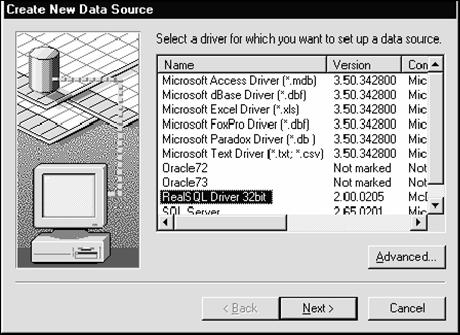
To add a User or System DSN, continue with the procedure Adding a User or System DSN.
To add a File DSN, continue with the procedure Adding a File DSN.
Adding a User or System DSN
To add a User or System DSN,
- Select the RealSQL Driver 32-bit entry.
-
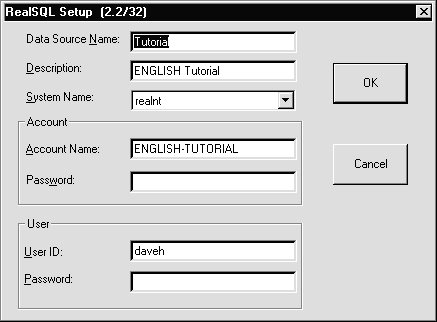
Click Finish at the bottom of the Create New Data Source dialog. The following dialog is then displayed.
-
Enter the following information:
Data Source Name
is the name that is referred to by the application.Description is a free text description of the data source.
System Name is the name of the appropriate PCSNI configuration entry.
Account is the Reality account or synonym account name that the connection will be made to and which holds the SQLSRVR MD entry and the SQL catalog.
Password is the Reality account password.
User ID On UNIX, this is the UNIX user-id that matches the Reality user-id. On Windows, this is the Reality user-id.
Password On a UNIX host, this is the UNIX login id password. On a Windows host, this is the Reality login id password.
- When you have finished entering the data source setup parameters, click OK. The data source is now ready for use.
Adding a File DSN
To add a File DSN:
-
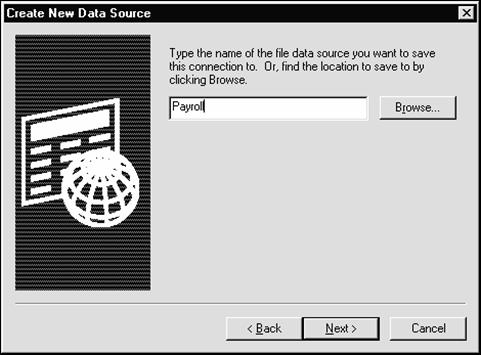
Select the RealSQL Driver 32-bit entry and click Next. This displays a dialog similar to the following:
-
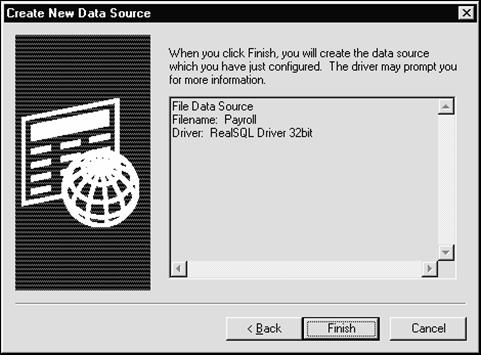
Type in the data source name and click Next. You are then prompted to confirm that you want to create the file data source with the specified file name and SQL/ODBC driver.
-
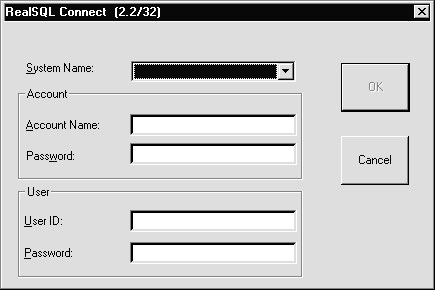
Click the Finish button to complete creating the file DSN. The RealSQL Connect dialog box is then displayed, as shown below.
-
Enter the RealSQL parameters required to connect to the data source:
System Name is the name of the appropriate PCSNI configuration entry.
Account is the Reality account or synonym account name that the connection will be made to and which holds the SQLSRVR MD entry and the SQL catalog.
Password is the Reality account password.
User ID For connections to a UNIX host, this is the UNIX login id that matches the Reality login id. For connections to Windows, this is the Reality login id.
Password For connections to a UNIX host, this is the UNIX login id password. For connections to Windows, this is the Reality login id password.
- When you have finished entering the data source setup parameters, click OK. The data source is now ready for use.
Procedure using ODBC 2 Tools
-
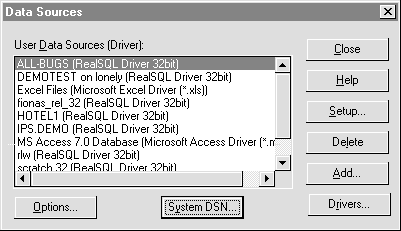
A dialog box similar to the following is displayed:
Note
The System DSN button may not appear on earlier versions of the 32-bit ODBC Admin utility. The different types of DSN are described in Procedure using ODBC 3 Tools.
-
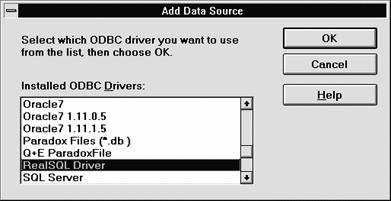
Select the Add... option from the Data sources screen to add a new source. The Add Data Source dialog is displayed:
-
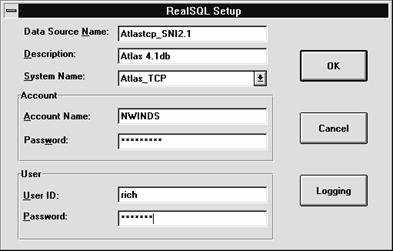
Select the RealSQL Driver and enter OK. The following dialog is displayed:
-
Enter the required data source setup parameters:
Caution
Parameters containing [ ] { } ( ) , ; ? * = ! @ or \ should be avoided, as they may cause a connection failure.
Data Source Name
is the name that is referred to by the application.Description is a free text description of the data source.
System Name is the name of the appropriate PCSNI configuration entry.
Account is the Reality account or synonym account name that the connection will be made to and which holds the SQLSRVR MD entry and the SQL catalog.
Password is the Reality account password.
User ID For connections to a UNIX host, this is the UNIX login id that matches the Reality login id. For connections to Windows, this is the Reality login id.
Password For connections to a UNIX host, this is the UNIX login id password. For connections to Windows, this is the Reality login id password.
- When you have finished entering the data source setup parameters, click OK. The data source is now ready for use.