Catalog Administration from a PC
This topic describes the use of the Microsoft Windows PC-based version of the SQL Maintenance utility (WinSQLM) to create, maintain and administer a Reality SQL catalog.
What is WinSQLM?
WinSQLM is a Microsoft Windows PC based version of the SQL Maintenance utility which allows you to convert the files in a Reality account, not previously used with SQL, into an SQL catalog, and also to maintain an existing SQL catalog. A number of files, which define the catalog, are created in the Reality account. Operations that can be carried out include:
· Create a new SQL table definition for an existing Reality file.
· Open an existing table definition.
· View and update column definitions.
· View and update index definitions.
· View and update privileges.
· View and update table information and allow/disallow table updates.
· View source file information.
· Test the ODBC connection.
Note: To use WinSQLM, you must have installed SQL/ODBC for Reality.
Starting WinSQLM
Click on the Start button and select menu options Programs/WinSQLM/WinSQLM.
Context Sensitive Help
Limited Help is available on most of the main screens by pressing Function key f1.
Administering and Connecting to an SQL Catalog
When you first start WinSQLM, the RealSQLM Connect dialog box is displayed:
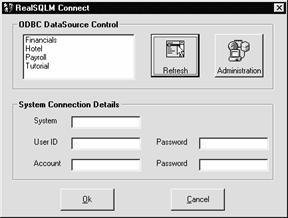
This dialog box contains the controls required to connect to and administer ODBC data sources on your PC. An ODBC data source is an SQL/ODBC connection to an SQL catalog.
Caution
Manually changing the System Connection Details on the RealSQLM Connect screen may cause the ODBC test to fail, or could mean that data returned by the ODBC test relates to different tables. This is because changing the System Connection Details does not affect the ODBC data source definition; hence, ODBC will use the original data source details.
RealSQLM Connect controls are, as follows:
ODBC DataSource Control
list box
lists available data sources for the RealSQL Driver. You can choose the data
source to connect to from this list.
Refresh button is used to update the data source list after a data source has been added or deleted.
System Connection Details
text boxes
which enable you to enter the parameters required to make the connection to a
data source.
Administration button
displays one of two Administration dialog boxes, depending on the version of
ODBC installed. Both dialogs contain a list of data sources and buttons to add,
remove and configure a data source. ODBC 3 supports different types of data source
names (DSNs), User, System and File DSNs.
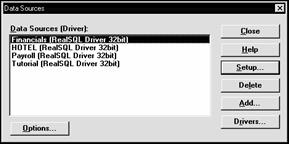
When Using ODBC 2 tools, the following dialog is displayed:
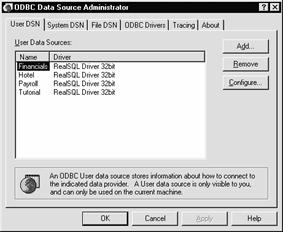
When Using ODBC 3 tools, the following dialog is displayed:
Configuring a Data Source
The Data Sources list box, displayed when you click on the Administration button, gives you the option of adding a new data source, deleting a data source which is no longer required, or re-configuring a current data source.
Adding a Data Source
Click on the Add button to add a new data source on your PC. This will display an Add Data Source list box. Continue with step 2 of the procedure Setting Up the SQL/ODBC Data Source.
Now choose the Refresh button on the RealSQLM Connect dialog box to update the list of data sources.
Re-configuring a Data Source
Click on the Setup button to re-configure a new data source on your PC. This will display the RealSQL Setup dialog box. Continue with step 4 of Setting Up the SQL/ODBC Data Source.
Deleting a Data Source
Click on the Delete or Remove button to remove a data source from your PC. This removes the PC connection to the specified SQL/ODBC Reality database.
Connecting to an SQL/ODBC Data Source
To connect to a Reality SQL/ODBC data source:
1. Click on the corresponding data source name in the ODBC DataSource Control list on the RealSQLM Connect dialog. This will automatically enter pre-configured system, user-id and account details for the chosen data source.
2. Type user and account passwords, if required, in the two Password boxes.
3. Click on the OK button.
The ODBC connection to the selected data source is now established. When the connection is complete, the WinSQLM main window is displayed. Refer to the topic Working with the WinSQLM Window.
Working with the WinSQLM Window
Once the connection to a Reality SQL/ODBC data source is made, the WinSQLM Window is displayed.
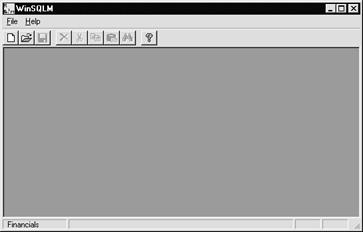
The WinSQLM Window has a number of the basic Microsoft Windows features, including a Control-menu box, Minimise/Maximise and Close buttons, Menu bar and Toolbar.
WinSQLM commands can be selected from the menu bar or toolbar. At first, only the three File commands (New, Open and Connect) and the Help command can be chosen from WinSQLM's menus, or the toolbar.
Menu Commands
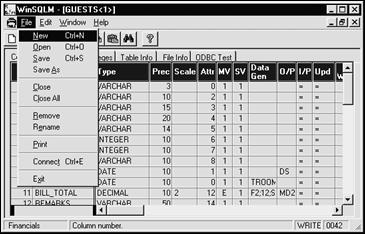
File Menu
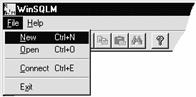
The File menu commands are:
· Create New table definition
· Open existing table definition
· Connect to a new data source. This displays the RealSQLM Connect dialog.
· Exit - close WinSQLM.
Help Menu
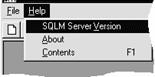
The Help menu commands are:
· SQLM Server Version - displays the version of the SQLM server.
· About - displays the version of the WinSQLM client.
· Contents - displays Help information.
Toolbar Commands
Only the two leftmost buttons and the Help button can be executed from the toolbar when the WinSQLM Window is first opened.
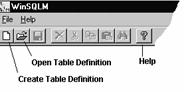
The other toolbar buttons are initially disabled. They are only enabled when their actions become valid for the current operation of WinSQLM.
Standard Windows symbols used on the WinSQLM toolbar are:
|
|
Create new table definition. |
|
|
Open table definition. |
|
|
Save table definition |
|
|
Delete. |
|
|
Cut. |
|
|
Paste. |
|
|
Copy. |
|
|
Find. |
|
|
Help. |
Creating a New Table Definition - Overview
WinSQLM enables you to create a new table definition, from a PC Windows environment, based on an existing Reality file, with associated column and index definitions derived from the data and index definitions of the specified Reality file. Where the file has no data definitions, WinSQLM enables you to create a table definition with any number of column definitions based on a default definition.
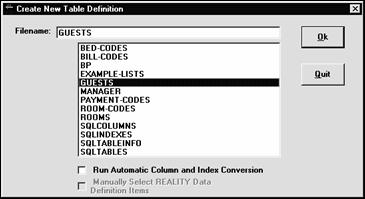
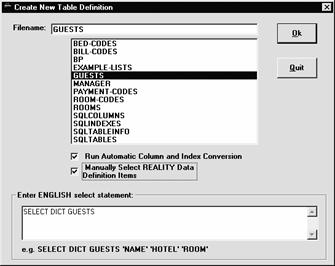
To do this, you must select the Create New Table Definition command, either on the File menu or by clicking the leftmost button on the toolbar. A Create New Table Definition window is then opened which contains a list of files residing in the local account, and two check boxes which allow you to choose the method for selecting data and index definitions to convert to column and index definitions.
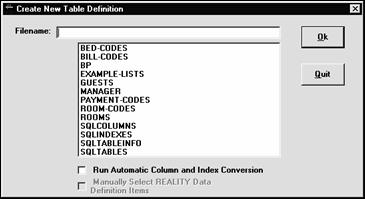
To choose the Reality file for conversion to an SQL table, use the mouse pointer to point to the name of the file in the file list and click the left button. This will enter the filename in the Filename: field. Alternatively, you can type in the filename.
Note: Only D-pointer files in the local account are shown in the file list.
Four methods are available for creating a table definition. The required method is chosen by selecting appropriate check boxes in the Create New Table Definition dialog box. The methods are:
· Manual selection of data/index definitions for conversion to column/index definitions - Using this method, you select data/index definitions items to be converted to column/index definitions from lists of definition items, for each attribute and index in the Reality file. This method is selected by leaving both check boxes unchecked.
· Automatic conversion of all data/ index definition to columns/index definitions. - Using this method, default column definitions are automatically created for all data definitions in the specified Reality file and table index definitions for all file indexes. This method is selected by clicking the upper check box only in the Create New Table Definition window.
· Automatic conversion of selected data/index definitions to columns/index definitions. - Using this method, default column definitions and table index definitions are created for a select list of data definition items and index definition items which you specify using the SELECT command. This method is selected by clicking both check boxes in the Create New Table Definition window.
· Creating a table for a Reality file with no data/index definition items. - This method is selected by leaving both check boxes unchecked. When you type in a filename which has no associated data definitions, and select OK, WinSQLM creates a single default column definition with identity NAME.
The method for creating a synonym table entry when you enter a file Q-pointer name, instead of a file D-pointer, in the Filename: field is described later in this topic under the topic Creating a Synonym Entry.
Note: When using the automatic method, the table definition is created on the host, hence, the ‘Save to disk’ icon is not highlighted immediately. However, when using the manual method, the table definition is created locally, hence, the ‘Save to disk’ icon is highlighted immediately after.
For guidance on designing table/column definitions see Application Index Design.
Creating a New Table using Manual Selection of Data/Index Definitions
This procedure allows you to select the data and index definitions on which you wish to base the table’s column and index definitions. It starts by displaying a list of data definitions for attribute 0, then for attribute 1, 2, 3 etc., in sequence. The procedure is, as follows:
1. Click on the filename you want to use as a basis for the table definition. This will enter the selected filename in the Filename: field. Leave both check boxes unchecked.
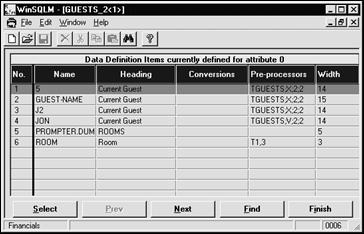
2. Click on the OK button. A window is opened, listing the data definition items available in the selected Reality file for attribute 0.
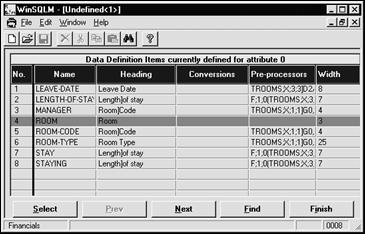
3. Click on a row to select a data definition item to base a column definition on, then click the Select button. Alternatively, double-click on the row. In either case the row will be shaded red indicating that it is selected.
4. Repeat step 3 until you have selected all data definitions for the current attribute on which you want to base column definitions, then choose the Next button to display a list of data definitions for the next attribute.
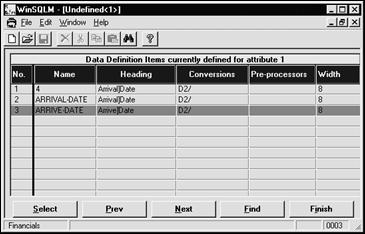
5. Repeat steps 3 and 4 for the next and subsequent attributes until the Next button is disabled.
If you wish to go back to a list of data definitions for an earlier attribute, click on the Prev button until the required list is displayed.
You can use the Find button to search for a string in the current window.
6. Finally, click the Finish button to conclude the setting up of column definitions.
7. If there are indexes associated with the selected filename, a window similar to that shown above is displayed, listing the index definitions. Perform a procedure, similar to that for data definitions described in steps 3 and 4, to select the index definitions you wish to include in the table definition. Once you have selected all required index definitions, click the Finish button.
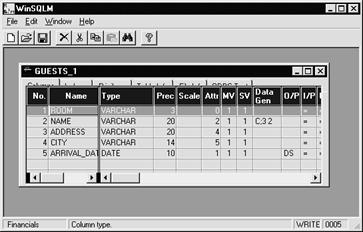
A table definition is then created which includes the selected column and index definitions (if any), and a Table Definition screen is displayed.
The text in the second field of the status bar at the bottom of the window changes to describe the meaning of the column or control where the mouse pointer is positioned. This text is displayed until the mouse pointer is moved.
8. Now, choose the Save, Save As or Close commands from the File menu.
A Save Table Definition As list box is then displayed for you to save the new table definition.
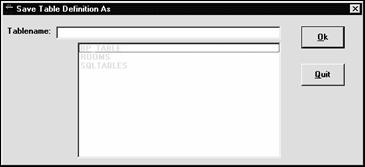
9. Type in a new table name and choose the OK button.
If you previously entered File Close, the new table definition is closed and an empty WinSQLM window is displayed. If you previously entered the Save or Save As commands, the new table definition remains open in the WinSQLM window.
10. Check the column and index definitions, if present, and update, if necessary, to ensure that they accurately define the required SQL columns and indexes. See the topic Viewing and Updating a Table Definitionon page 18.
Creating a New Table using Automatic Conversion of All Data/Index Definitions
Caution
This automatic process uses a “best fit” technique to generate SQL column and index definitions from existing Reality data and index definitions. It is reasonably accurate in simple cases, but cannot be guaranteed to generate correct results in all circumstances. It is therefore important that column and index definitions generated by this process are checked for accuracy. In particular, check the following:
· Data type, precision, and scale for each column definition.
· Decisions about exploding multivalues and subvalues.
· Column(s) chosen as the table’s Primary Key.
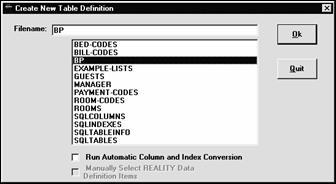
This procedure is selected to allow WinSQLM to automatically create a table with column and index definitions for all data and index definitions associated with the selected file. The procedure is, as follows:
1. Click on the filename you want to use to create the table. This enters the selected filename in the Filename: field.
2. Click on the upper check box to ‘Run Automatic Column and Index Conversion’. The lower check box is enabled, but must be left unchecked.
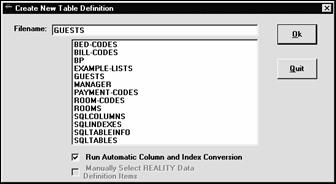
3. Click on the OK button. Automatic conversion of selected data and index definitions to column and table index definitions is now executed. When conversion is complete, the new table definition is displayed.
4. Check the column and index definitions and update, if necessary, to ensure that they accurately define the SQL data/indexes for that table. In particular, check the following in the column definitions:
· Data type, precision, and scale for each column definition.
· Decisions about exploding multivalues and subvalues.
· Column(s) chosen as the table’s primary key(s).
See the topic Viewing and Updating a Table Definition.
Creating a New Table using Automatic Conversion of Selected Data/Index Definitions
Caution
This automatic process uses a “best fit” technique to generate SQL column and index definitions from existing Reality data and index definitions. It is reasonably accurate in simple cases, but cannot be guaranteed to generate correct results in all circumstances. It is therefore important that column and index definitions generated by this process are checked for accuracy. In particular, check the following:
· Data type, precision, and scale for each column definition.
· Decisions about exploding multivalues and subvalues.
· Column(s) chosen as the table’s Primary Key(s).
This procedure is used to create a table definition with column and index definitions from a SELECT list of data and index definitions associated with the selected file. The procedure is as follows:
1. Click on the filename you want to use as a basis for the table definition. This will enter the selected filename in the Filename: field.
2. Click on both check boxes, ‘Run Automatic Column and Index Conversion’ and ‘Manually Select Reality Data Definition Items’.
When you select ‘Manually Select Reality Data Definition Items’, a text box will be displayed containing the first part of a SELECT statement.
3. Complete the SELECT statement in order to create a select list of data definitions and indexes on which you wish to base column definitions and indexes.
Note: In order to complete the SELECT statement you must know the data and index definition item ids for the selected file. If necessary, log on to the account in which the SQL catalog is defined and use the SORT4 and CT commands to look at the file’s data definition items. The LISTFILES command can be used to list indexes.
The SELECT statement will be similar to the following:
It is recommended that you always specify a primary key for a table. If WinSQLM creates a table definition with no primary key defined, a warning message is displayed.
4. Click on the OK button. A select list of the specified data definitions and index definitions is now created and automatic conversion of the selected items to column and table index definitions is carried out.
When conversion is complete, the newly created table definition screen is displayed.
5. Check the column and index definitions and update, if necessary, to ensure that they accurately defines the SQL data/indexes for that table. In particular, check the following in the column definitions:
· Data type, precision, and scale for each column definition.
· Decisions about exploding multivalues and subvalues.
· Column(s) chosen as the table’s primary key.
See the topic Viewing and Updating a Table Definition.
Creating a New Table For a File with No Data Definition Items
This procedure allows you to create a table definition for a Reality file which has no data or index definitions. The procedure is, as follows:
1. Click on the filename you want to use as a basis for the table definition. This will enter the selected filename in the Filename: field. Leave both check boxes unchecked.
2. Click on the OK button. A table definition with a single default column definition is displayed. For example:
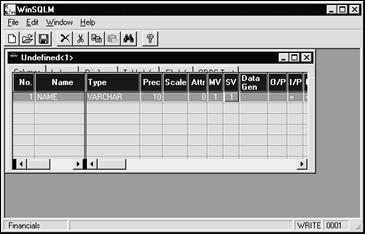
3. Modify the default column definition to fit your file's data and create any additional columns that are needed. Be careful to ensure that your column definitions accurately define the data in your file. In particular, check the following:
· Data type, precision, and scale for each column definition.
· Decisions about exploding multivalues and subvalues.
· Column(s) chosen as the table’s primary key.
See the topic Viewing and Updating a Table Definition
4. When you’ve finished modifying the table definition, choose the Save, Save As or Close commands from the File menu. The following text box is then displayed for you to save the new table definition:
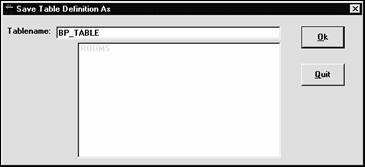
5. Type in a new table name, and click on the OK button.
Opening a Table Definition
WinSQLM enables you to open an existing table definition in order to view and if required, update the definition data. The procedure is, as follows:
1. Select the Open Table Definition command, either by clicking the Open command on the File menu, or the File Open button on the toolbar. This displays an Open Table Definition list box.
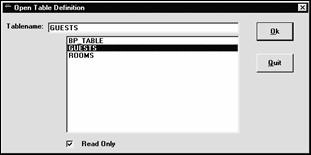
2. Click on the name of the table definition you want to open. This enters the selected table name in the Tablename: field.
3. If you wish to update the table definition, de-select the Read Only check box, otherwise leave checked.
4. Click on the OK button. A Table Definition window is then opened.
Viewing and Updating a Table Definition
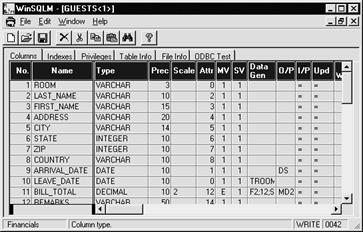
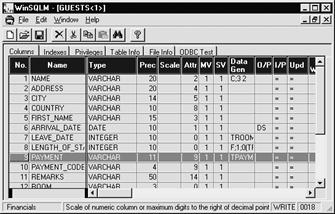
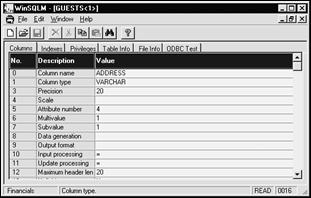
The Table Definition screen, shown below, comprises six pages of data, Columns, Indexes, Privileges, Table Information, File Information and ODBC Test, each of which can be displayed by clicking on a tab at the top of the page.
Note: To update a table definition, the Read Only check box must be de-selected when the table is opened.
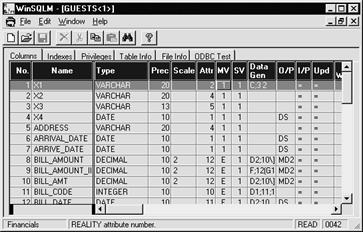
Columns Page
The Columns page contains a table of column definitions. This is displayed in the foreground when the table is first opened. Refer to SQL Column and Index Definitions for a description of column definition fields.
Alternative View of Column Definition
By pressing SHIFT and clicking on the required row on the Columns tab, you can also display the following alternative view of a column definition:
You can update the column definition in this alternative view in the usual way using text fields, drop down menus, list boxes etc. See Changing a Cell.
To view another column definition, press shift and click anywhere in the alternative view of the current column definition. This returns you to the list of column definitions. Press SHIFT again and click on the row containing the next column definition you wish to view.
Adding a Column Definition
To add a new column definition:
Note: This procedure is enabled only if the Read Only check box on the Open Table Definition list box is de-selected.
1. Using the Down Arrow key, scroll down the list of column definitions on the columns page beyond the bottom row. You will be prompted to confirm the operation. Click Yes to continue.
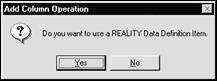
2. You will then be asked if you want to use an existing Reality Data Definition Item. If you wish to use an existing data definition continue with step 3. If you want to create a new column definition without basing it on an existing data definition, continue with step 6
Adding a Column Based on an Existing Data Definition
3. Click on the Yes button to use an existing data definition. A dialog box is then displayed, prompting you to enter the name of the Reality file dictionary which contains the data definition to be used.
4. Enter the appropriate filename and click on the OK button. A list of data definitions for attribute 0 in the selected file is then displayed.
5. Now continue from step 3 of the procedure Creating a New Table using Manual Selection of Data/Index Definitions.
Adding a Column Not Based on an Existing Data Definition
6. To create a new column definition without basing it on an existing data definition, click on No in the Add Column Operation dialog box.
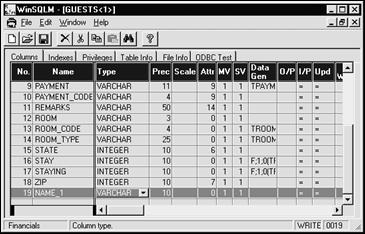
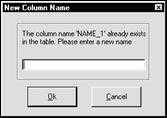
WinSQLM will then automatically create a default column definition with the identity NAME, or if NAME already exists, a derivative thereof, NAME_1, NAME_2 etc. Modify the default column definition to suit your data requirements.
Updating Column Definitions
Column definitions on the Columns page can be updated as follows:
Note: This procedure is enabled only if the Read Only check box on the Open Table Definition list box is de-selected.
Deleting a Column
To delete a column, select the column definition, then :
Click on the Delete button on the toolbar, or select the Delete command from the Edit menu, or press the Delete key on the keyboard. In each case, you will be prompted to confirm the delete operation.
Copying a Column
To copy a column, select the column definition and use the standard Windows Copy and Paste procedures. These can be selected from the Edit menu, the Copy and Paste toolbar buttons or using the standard keyboard shortcuts ctrl+c, ctrl+v. A New Column Name text box is then displayed.
Moving a Column
To move a column, select the column definition, then drag and drop it at the required position in the list of columns. You will be prompted to confirm the move operation.
Copying Between Tables
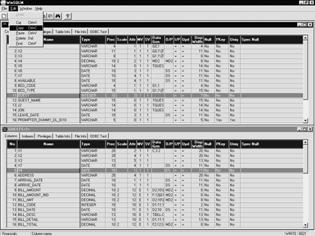
You can copy a column definition from one table to another by displaying the two table definitions in separate windows and copying and pasting, or dragging the appropriate row from the source table definition to the destination table.
1. Open the two table definitions. See Opening a Table Definition.
2. Use the Window menu on the WinSQLM window to display the two table definitions. Either cascade or tile them. For example, the following are horizontally tiled.
3. Click on the column definition to be copied.
4. Select the Copy command on the File menu.
5. Click on the row in the destination table definition that is below the position where you want to copy the column.
6. Select the Paste command on the File menu.
Alternatively, you can select the column definition to be copied and drag and drop it at the appropriate place in the destination table definition.
Changing a Cell
To select an individual cell to change, double click on it.
Numeric and text cells without a drop-down list can be updated by deleting their contents and entering new data, subject to the restrictions defined in SQL Column and Index Definitions
Text cells, such as Type, Null, Pkey, Uniq and Spec Null, can be changed using a drop-down list. First you select the cell to display the list down-arrow. Then click on the arrow to display a drop-down list of valid text strings which can be entered in the cell. For the Type field, a list of variable types is displayed. For the Null, Pkey, Uniq and Spec Null fields, a Yes/No list is displayed. You then click on the required list option to enter it in the cell.
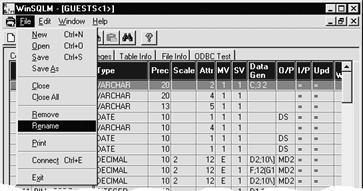
Renaming a Table
You can rename a table definition by selecting the File Rename menu option on the table definition screen.
You will be prompted to confirm the operation. Click Yes to continue. You are then asked for the new name:
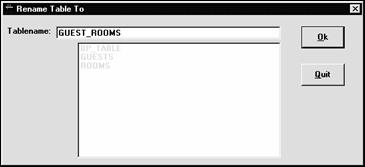
Enter the new table name and click OK. The table is now renamed.
Deleting a Table Definition
You can delete a table definition from the catalog by selecting the File Remove option on the table definition screen.
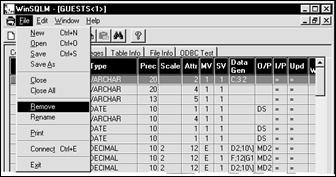
You will be prompted to confirm the deletion. Click Yes to remove the table from the catalog.
Indexes Page
The Indexes page, displayed by clicking on the second tab from the left, allows you to view information about the table’s indexes and to add and remove them from the data source. The left-hand side contains a list of indexes associated with the table. Click on an index name to display information about it on the right.
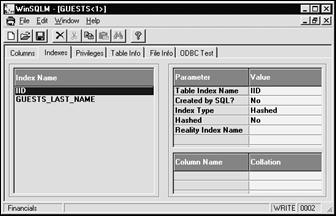
A hashed index called IID is created by default with every new table, corresponding to the Reality item-id. Other indexes are created based on Reality indexes, if the file indexes are selected by the create table definition conversion process.
You can add and delete indexes, as described below.
Deleting an Index
To delete an SQL index, select the index name in the left-hand field of the Indexes page, illustrated above, and select Edit/Delete from the WinSQLM menu. You will be prompted to confirm the delete operation - click 'Yes' to remove the index from the catalog.
Adding an Index
To add an index for the GUESTS table to the catalog, use the Down Arrow key, to scroll down the list of indexes on the Index page beyond the bottom row. You will be prompted to confirm the operation - click 'Yes' to add an index. A list of Reality index definitions is then displayed. For example:
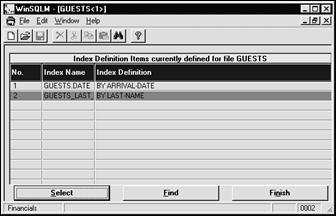
Click on the Reality index definition required to convert to an SQL index, for example GUESTS_DATE, then click on 'Select'. Alternatively double-click on the index name. Finally click on 'Finish'. The Indexes page is then redisplayed with the new SQL index listed, as shown below.

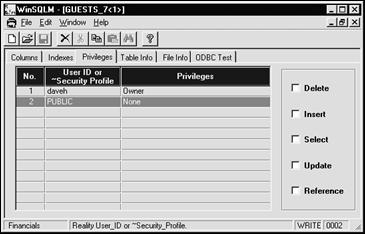
Privileges Page
The Privileges page, displayed by clicking on the third tab from the left, allows you to view and update privilege grants assigned for the current table to specified user-ids and security profiles, and to add new user grants.
Privilege grants determine the access that a user has to the data in the table.
The Privileges page displays the privilege grants currently assigned for the table and check boxes which are used to set up privilege grants.
Two sets of privilege grants are assigned by default to a new table definition; the user-id of the user that created the table (the owner) and the general id PUBLIC.
The table owner has full privileges. The PUBLIC id initially has no privileges.
Updating Current Privilege Grants
Note: This procedure is enabled only if the Read Only check box on the Open Table Definition list box is deselected.
To update current privilege grants:
1. Select the row of privileges to be updated. This causes the row to be highlighted with a darker maroon.
2. Select/de-select the appropriate check boxes, Delete, Insert, Select, Update and Reference, located on the right hand side of the Privileges page.
Privileges which can be granted are:
Delete Allows a user to delete records (rows) from the table.
Insert Allows a user to insert records (rows) in the table.
Select Allows a user to select (report or list) records.
Update Allows a user to update records.
Reference Allows a user to ‘reference’ records. (This is necessary when the table is referenced via a ‘foreign key’ in another table.)
Adding a New User or Security Profile Grant
Note: This procedure is enabled only if the Read Only check box on the Open Table Definition list box is deselected.
To add privilege grants for a new user or security profile:
1. Click on the bottom row of the Privileges table (for example, 2. PUBLIC) and press the down-arrow key.
An Add Privilege Grants text box is then displayed.
2. Enter the id of the user or security profile for which you want to add privilege grants e.g. SYSMAN
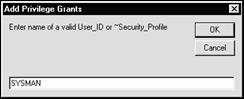
Note: A security profile name must be prefixed with a ‘~’ character.
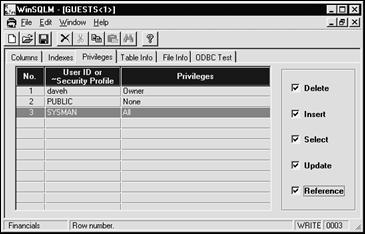
3. Click on the OK button.
The new user-id is then added to the bottom of the table with ‘Select’ privilege. If you wish to change privileges, select/deselect the appropriate check boxes.
Deleting a User or Security Profile Grant
To delete a user/security profile grant, select the row to delete, then perform one of the three following actions:
Note: This procedure is enabled only if the Read Only check box on the Open Table Definition list box is deselected.
· Press the Delete key on the keyboard.
or
· Click on the Delete button on the toolbar.
or
· Select the Delete command from the Edit menu.
In all cases, you are prompted to confirm the delete operation.
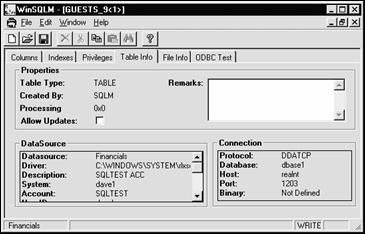
Table Information Page
The Table Information page (shown below), displayed by clicking on the third tab from the right, allows you to view information about the table and to enable/disable all updates to the table by checking/unchecking the Allow Updates box. It also allows you to add free text notes in a Remarks field.
File Information Page
The File Information page (shown below), displayed by clicking on the second tab from the right, allows you to view information about, and raw data in, the Reality file referenced by the table definition. It also allows you to change the file that is referenced.
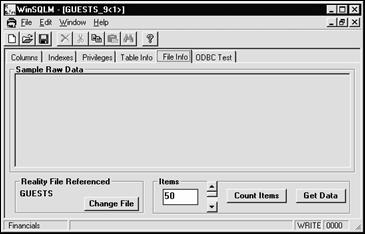
To view file information for a particular Reality file, you must.
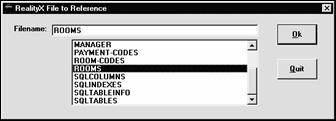
1. Select the Reality file to be viewed. The default is the file for which the table definition was created. To select a different file to be referenced, click on the Change File button. This displays a Reality file to Reference dialog box, requesting you to enter the name of the file you want to look at.
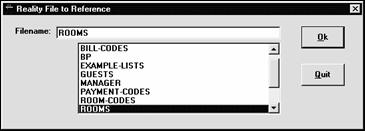
2. Click on the filename in list box and select the OK button.
3. Now on the File Information page, select the number of items in the file to be displayed and click on the Get Data button. A report on the raw data in the referenced Reality file is then displayed.
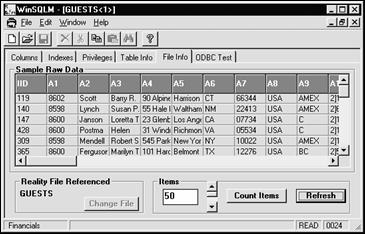
To count the items in the currently selected file, click on the Count Items button. The number of items counted is then displayed in the Items: list box.
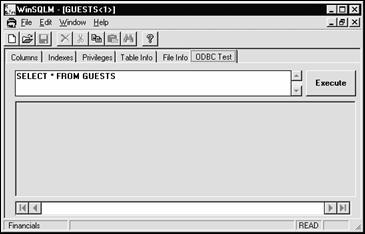
ODBC Test Page
The ODBC Test page (shown below), displayed by clicking on the rightmost tab, allows you to test the ODBC connection to the current SQL data source.
Caution
This test attempts to use ODBC to connect to a data source using the DSN selected on the RealSQLM Connect screen.
If the System Connection Details on the RealSQLM Connect screen have been manually changed, the ODBC test may fail, or may return data relating to different tables from those in the data source that is currently connected to. This is because changing the System Connection Details does not affect the ODBC data source definition, hence ODBC will use the original data source details not the current ones.
To test the ODBC connection type an SQL query in the text box, then click on the Execute button. This will execute the SQL query specified in the text box and display the results in the box below it. The default query is:
SELECT * FROM default_table,
In the above example the default file is GUESTS. This can be modified as required.