Reality Client Components
Installation Guide
Overview
This Installation Guide describes the procedure for installing Reality client components.
Terms and Abbreviations
|
DDA |
Distributed Data Access |
|
HTML |
HyperText Markup Language |
|
JDBC |
Java Database Connectivity |
|
JRE |
Java Runtime Environment |
|
ODBC |
Open Database Connectivity |
|
PCSNI |
PC Standard Network Interface |
|
RSC |
Remote Subroutine Call (Remote Basic) |
|
SQL |
Standard Query Language |
|
TCP/IP |
Transmission Control Protocol/Internet Protocol |
|
WinSNI |
The Windows component of PCSNI. |
|
Winsock |
Windows Socket Library |
Product Overview
Refer to either of the Reality Installation Guides (Reality on UNIX, Installation Guide or Reality on Windows, Installation Guide).
Contents of the Installation CD
The first Reality CD contains the following client components.
PCSNI Standard network interface software for Windows that provides a consistent network and device independent interface to a LAN card. The WinSNI Configuration Editor, a tool for setting up PCSNI connections, must be installed separately.
RealEdit A Reality editor running under Windows. Similar in operation to other Windows editors, but also allows you to perform Reality-specific operations such as compiling and cataloging DataBasic programs, and viewing included code.
RealSQL-ODBC Driver Allows ODBC-compliant Windows applications to read and write data to a Reality database using SQL.
RealSQL-JDBC Driver Allows JDBC-compliant applications to read and write data to a Reality database using SQL. Includes a standard API that can be used in Java applications, applets and servlets. Can be installed on both Windows and UNIX.
WinSQLM A Windows utility that assists in creating SQL tables based on existing Reality dictionary definitions.
JReal This provides the Java programmer with the ability to access Remote Basic subroutines (DataBasic subroutines that have been enabled for remote access), and to write custom servlets to access a Reality database via RealWeb.
RealWeb Provides the Web developer with access to data held in a Reality database. Consists of a set of Java servlets that run on a web server and a DataBasic API for constructing HTML pages. Can be installed on both Windows and UNIX.
Remote Tape Server Provides the means of saving and restoring Reality data on remote tape drives. Can be installed on both Windows and UNIX.
The second Reality CD contains the following client components.
Reality Web Services Provides a way of making programming resources available to remote applications, by exposing subroutines and functions using a web server.
Starting the Installation
Note: If you are installing Reality Web Services, refer to Reality Web Services.
Windows
Before installing Reality, you must close down all other applications, including any anti-virus software.
1. Log on to Windows as an administrator.
2. Insert the first Reality CD in the drive and run SETUP.EXE.
When the introductory screen appears, click Custom followed by Continue.
3. If you are installing for the first time, the Reality licence agreement is displayed. You must accept this agreement before you can continue.
4. When the main menu appears, select the option you require (see the descriptions of the individual components).
UNIX
You can start the installation when logged on as any user. However, if you are not root/superuser you will need to enter the root/superuser password.
1. Confirm that the partition (for example, /realman) has enough space for the new release. You will need at least 220Mb.
2. Load the first Reality CD into the drive.
3. Mount the CD as described in Mounting a CD on UNIX.
4. Run the installation procedure by entering:
ksh ./setup
5. If you are installing for the first time, the Reality licence agreement is displayed. Press the space bar to move through the agreement page by page, or q to skip to the end. You will then be asked if you accept the licence - you must answer y to continue the installation.
6. Select option b) Install Client Components from the menu that appears.
Upgrading to a New Version
Note that where a client component is marked on the Installation Menu as Update, this indicates that an earlier version of that component is installed and can be upgraded. If a component is marked as Overwrite, this indicates that the installed version is the same as the version on the installation CD.
Removing the Client Components
On Windows, you can remove a Reality client component via the Control Panel Add/Remove Programs option. The exceptions to this is PCSNI, which is a 16-bit application; it is recommended that you do not attempt to uninstall PCSNI.
PCSNI
The PC Standard Network Interface software for Windows (PCSNI) provides a consistent network and device independent interface to a LAN card. It is a prerequisite for a number of other client components.
The WinSNI Configuration Editor, a tool for setting up PCSNI connections, must be installed separately.
Prerequisites
· Refer to the Reality Release Information for details of which versions of Windows are supported.
· A LAN card.
· TCP/IP networking.
· A way of resolving host name and IP addresses (for example, a hosts file or a domain name service).
Installation
PCSNI
· Start the installation program as described for Windows in the section Starting the Installation.
· Select PCSNI from the Core Reality Software menu.
· Select one component: SNI Winsock.
· If you are replacing an earlier revision of PCSNI, you will be asked if you want to overwrite your WINSNI.INI configuration file. You should answer No to this question.
· Similarly, you may be asked if you want to replace the files ROSFS.DLL and BC30RTL.DLL. In both cases answer Yes.
WinSNI Configuration Editor
· Select WinSNI Configuration Editor from the Core Reality Software menu.
· The default location is c:\Program Files\WinSNI Configuration Editor; you can override this if required.
Set-up After Installation
You configure the SNI software with the WinSNI Configuration Editor (see screen display below).
Note: If you are using a Windows Vista host that is shared by a number of users, you should always run the WinSNI Configuration Editor as an administrator. If you run it as a normal user, any changes you make will be local to that user.

· For Telnet connections to UNIX and Windows hosts, ensure that your default options are set to the Telnet protocol on port 23. You will then be able to connect to any host that can be resolved by TCP/IP (using, for example, a hosts file or a domain name service), even if that host does not appear in your WinSNI configuration file.
· For direct connection to a Reality database, create a WinSNI entry by using the Connection Details section on the left-hand side, as follows:
|
Connection Name |
This is the name which you will use when making a connection. Use a local alias for the Reality database. |
|
Host |
This can be either: · A system name as specified in your TCP/IP hosts file, Domain Name Service or Network Information Service, depending on your TCP/IP configuration. · An IP address of up to twelve digits (plus any separators). |
|
Protocol |
Choose DDATCP from the drop-down. |
|
Database name |
The name of the required Reality database. |
|
For the DDATCP protocol, this must be set to 1203. |
For more information on how to configure PCSNI, refer to the PCi Standard Network Interface section.
RealEdit
RealEdit is a Reality editor that runs on Windows PCs. It is similar in operation to other Windows editors, but also allows you to perform Reality-specific operations such as compiling and cataloging DataBasic programs, and viewing included code.
Prerequisites
· Refer to the Reality Release Information for details of which versions of Windows are supported.
· PCSNI software V2.2 Rev C or later.
Installing RealEdit
· Start the installation program as described for Windows in the section Starting the Installation.
· Select RealEdit from the Utilities menu.
· The default location is c:\Program Files\NorthgateIS\RealEdit; you can override this if required.
Set-up After Installation
For each database in which you want to edit items using RealEdit:
· Log on to the SYSMAN account and run SETUP-ACCOUNT. Select the accounts on which you want to use RealEdit and, from the Features screen, the RealEdit feature. Then enter . to install the feature.
Note: Enter ? for information about how to use SETUP-ACCOUNT, or refer tothe Reality on-line documentation.
· While logged on to the SYSMAN account, run SSM. For each user-id that will be used to access RealEdit, use SSM option 2 to set the status (field 13) to ’E’ (enabled) and the type (field 14) to ‘S’ or ‘*’ (so that it can be used as a server).
· Use SSM option 3 to configure the security profiles associated with these user-ids, setting field 8 to specify an alternative security profile to be used when logged in via the RealEdit server, EXPSRVR. You can specify DEFAULT.EXPLORER as this alternative profile, or you can set up a new security profile, based upon DEFAULT.EXPLORER, to be used with RealEdit. Refer to the Reality on-line documentation for more details.
· Start RealEdit on the client.
· Select an existing WinSNI entry from the drop-down list, or use the Edit WINSNI button to create a new WinSNI entry for the required database. The entry must be set up for direct connection to a Reality database (for details, see the description of how to set up PCSNI).
JReal
JReal provides the Java programmer with the ability to access Remote Basic subroutines (DataBasic subroutines that have been enabled for remote access), and to write custom servlets to access a Reality database via RealWeb. It comprises:
· DDA classes within the com.northgateis.comms.dda package. These classes allow a Java program to make a connection and access information in a Reality database by sending DDA messages across a TCP/IP network.
· RSC classes within the com.northgateis.reality.rsc package. These classes allow a Java program to access a Remote Basic subroutine (a DataBasic subroutine that has been enabled for use via remote access).
· Utility classes - including ItemView, which allows a Reality item to be broken down into attributes, values and subvalues.
· Servlet connection classes, which allow you to write custom servlets to access a Reality database via RealWeb.
Prerequisites
Java Run Time Environment (JRE) version 1.2 or above. If this is not available, it can be downloaded from Sun’s Java web site (http://java.sun.com/j2se/).
Installation
Windows
· Start the installation program as described for Windows in the section Starting the Installation.
· Select JReal from the Core Reality Software menu.
· The default location is c:\Program Files\NorthgateIS\JReal-3.0; you can override this if required.
· You can select up to two components: Program Files and Help Files. Highlight an item to display a description of that component.
UNIX
1. Start the installation program as described for UNIX in the section Starting the Installation.
2. Enter the root password when prompted. The following menu is displayed:
Reality
CD-ROM Component Installation Utility
The following components are available
JDBCdriver V1.0 RealSQL-JDBC driver interface to
Reality
JReal V3.2 Java interface to Reality (DDA & RSC)
RealWeb V3.2 Web interface to Reality
Select component to install
Install JDBC driver y/n/q [n]:
Install JReal y/n/q [n]:
Install RealWeb y/n/q [n]:
3. Enter y to select the required component.
4. Enter the installation directory when prompted. The default location is /usr/northgateis/Product-Version, but you can change this if required.
Set-up After Installation
CLASSPATH
1. Add the jreal.jar file to CLASSPATH. For example, on UNIX:
/usr/northgateis/JReal-3.1/class/jreal.jar
or on Windows:
C:\Program Files\NorthgateIS\JReal-3.1\jreal.jar
2. Add the class directory to CLASSPATH.
On UNIX:
/usr/northgateis/JReal-3.1/class
On Windows:
C:\Program Files\NorthgateIS\JReal-3.1\class
This contains the reality.properties file.
For information on how to set CLASSPATH, refer to Setting Environment Variables.
User-ids
To call a Remote Basic subroutine using JReal, you must establish a connection to an account on a Reality database – you will need to use a user-id that has been set up as follows.
Log on to the SYSMAN account and run SSM. Then do the following:
1. Use SSM option 3 to create a security profile to be used with the Remote Basic server. It is recommended that this profile should have field 23 (Remote Basic) set to R (restricted); you must also specify a file in which the subroutines that can be called remotely are listed. For more information on client access security, refer to the Reality on-line documentation.
2. Use SSM option 2 to set up a user-id that will be used to access your Remote Basic subroutines. Set the status (field 13) to ’E’ (enabled) and the type (field 14) to ‘S’ or ‘*’ (so that it can be used as a server). Note that on a UNIX host a corresponding UNIX user-id must also exist, and it is the password for the UNIX user-id that must be used when establishing a connection.
3. Use SSM option 3 to configure the security profile associated with the user-id you have created, setting field 8 (Alt Server Profiles) to specify that the Remote Basic server (RBSRVR) should use the security profile you created in step 1.
RealSQL-ODBC Driver
The RealSQL-ODBC Driver allows ODBC-compliant applications, such as Microsoft Word and Excel, to read and write data to a Reality database using SQL.
Prerequisites
· Refer to the Reality Release Information for details of which versions of Windows are supported.
· PCSNI software V2.2 Rev C or later.
· Any ODBC Level 1 or 2 compliant application.
· If you are connecting to a Reality database on a UNIX host, the host will require UNIX-Connect.
Installation
Note: Before you can install the RealSQL-ODBC Driver, you must install PCSNI.
· If you have not already done so, start the installation program as described for Windows in the section Starting the Installation.
· Select RealSQL-ODBC Driver from the SQL Software menu.
· The default location is c:\Program Files\NorthgateIS\RealSQL-ODBC; you can override this if required.
Set-up After Installation
This section describes how to set up a connection to an SQL catalog on a Reality database for testing purposes. For more detailed information on setting up and maintaining a connection to an SQL catalog on a Reality database using ODBC or JDBC, refer to SQL for Reality.
On the Host System
SQL User-ids
· For each Reality user-id that will use SQL, use SSM option 2 to set the type (field 14) to ‘S’ or ‘*’ so that it can be used as a server.
· Users that will be permitted to modify SQL catalogs must have this enabled in their security profile (set SSM option 3, field 21 to Y).
Setting up the Reality Account
To make an account accessible to client ODBC or JDBC connections, log on to the account and enter SQLM at TCL.
Enter Y at the following prompt:
This Account is not configured or up to date for SQL.
Do you want to set it up or update it (Y/N):
Press RETURN at the SQLM prompt to return to TCL.
To confirm that the account has been set up correctly, enter SQL.DEMO at TCL. Continue at the first prompt, and all 15 rows of the EMP table should be displayed. Enter X at the end of any test, followed by Y to retain the sample tables used in the demonstration.
SQL Catalogs
If you are going to be creating your own SQL catalogs, rather than using a Northgate-supplied catalog, you create the catalogs using the TCL verb SQLM. For detailed information on how to set up and maintain an SQL catalog on a Reality database, refer to the SQL for Reality.
On the Client
Configuring the Standard Network Interface
To connect to a Reality database using ODBC, you will need a WinSNI entry for direct connection to a Reality database (for details, see the description of how to set up PCSNI.
Setting up the SQL/ODBC Data Source
An ODBC data source stores information about how to connect to the indicated data provider.
Note: It is assumed throughout this section that you have sufficient system privileges to perform these operations.
To add a data source to an ODBC compliant application:
1. Select the 32-bit ODBC administration icon from the Control Panel. Note that on Windows 2000, Server 2003 and XP, the ODBC icon is in the Control Panel’s Administrative Tools group (when in Category view on Windows, Server 2003 or XP, the Administrative Tools group is under Performance and Maintenance).
Note: The ODBC administration icons have different names on different versions of Windows. Check that you have selected the correct icon.
The dialog that follows assumes that you are using ODBC 3 administration tools (the dialog title is ODBC Data Source Administrator). It provides instructions for setting up a System DSN (Data Source Name), but does not include details of User or File DSNs. For information about using ODBC 2 tools and setting up other types of DSN, refer to the SQL for Reality.
2. Select the System DSN tab: (a System DSN is visible to all users of the host)

3. Click the Add button. This displays the following screen:

4. From the list select RealSQL Driver 32bit and click Finish.
The following RealSQL Setup dialog box is then displayed.
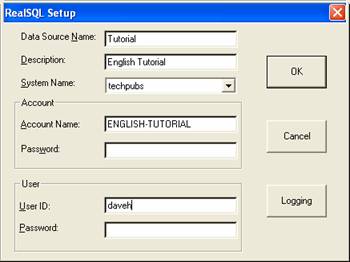
5. Enter the following information:
|
Data Source Name |
is the name that is referred to by the application. |
|
Description |
is a free text description of the data source. |
|
System Name |
is the name of the appropriate entry in the PC's PCSNI configuration file. |
|
Account |
is the Reality account or synonym account name that the connection will be made to and which holds the SQLSRVR MD entry and the SQL catalog. |
|
Password |
is the Reality account password. |
|
User ID |
On UNIX, this is the UNIX user-id that matches the Reality user-id. On Windows, this is the Reality user-id. |
|
Password |
On a UNIX host, this is the UNIX user-id password. On a Windows host, this is the Reality user-id password. |
When you have finished entering the data source setup parameters, click OK. The data source is now ready for use.
Testing a Connection to the Reality ODBC Data Source
A test program, RealDbTest, together with its original source file, is supplied as part of the driver installation. This program, stored in Program Files/NorthgateIS/RealSQL-ODBC/SampleApp, is a simple program designed to establish a connection to a Reality database, execute a supplied SQL statement and display the results.
To connect to a System DSN called DEMO:
realdbtest -d”DEMO” -s”SELECT * FROM EMP”
RealSQL-JDBC Driver
The RealSQL-JDBC Driver allows JDBC-compliant applications to read and write data to a Reality database using SQL. It includes a standard API that can be used in Java applications, applets and servlets.
Prerequisites
· Java Run Time Environment (JRE) version 1.2 or above. If this is not available, it can be downloaded from http://java.sun.com/j2se/.
· If you are connecting to a Reality database on a UNIX host, the host will require UNIX-Connect.
Installation
Windows
· Start the installation program as described for Windows in the section Starting the Installation.
· Select RealSQL-JDBC Driver from the SQL Software menu. Note that JReal is a prerequisite for the JDBC driver; if you have not already installed JReal, this is loaded automatically.
· The default location is c:\Program Files\NorthgateIS\RealSQL-JDBC-1.0; you can override this if required.
· You can select up to four components: Program Files, Example Files, Help Files and a Test Utility. Highlight an item to display a description of that component.
UNIX
· Start the installation program as described for UNIX in the section Starting the Installation.
· Enter the root password when prompted. The following menu is displayed:
Reality CD-ROM Component Installation Utility
The following components are available
JDBCdriver V1.0 RealSQL-JDBC driver interface to
Reality
JReal V3.2 Java interface to Reality (DDA &
RSC)
RealWeb V3.2 Web interface to Reality
Select component to install
Install JDBC driver y/n/q [n]:
Install JReal y/n/q [n]:
Install RealWeb y/n/q [n]:
· Enter y to select the required components. Note that JReal is a prerequisite for the JDBC driver; if you have not already installed JReal, this is loaded automatically.
About to install ......... Confirm?
Enter y to continue.
· Enter the installation directory for each component when prompted. For JReal and the JDBC Driver, the default location is /usr/northgateis/Product-Version, but you can change this if required.
Set-up After Installation
On the Host System
Setting up the host for use with RealSQL-JDBC is the same as for RealSQL-ODBC.
On the Client
Adding Files to CLASSPATH
· Set up the CLASSPATH environment variable for JReal.
· Add the realsql-jdbc.jar file to the CLASSPATH. For example, on UNIX:
/usr/northgateis/RealSQL-JDBC-1.0/realsql-jdbc.jar
or on Windows:
C:\Program Files\NorthgateIS\RealSQL-JDBC-1.0\realsql-jdbc.jar
· If you want to run the Test Utility, you must also add the RealJTest file to CLASSPATH. On UNIX:
/usr/northgateis/RealSQL-JDBC-1.0/RealJTest
or on Windows:
C:\Program Files\NorthgateIS\RealSQL-JDBC-1.0\RealJTest
For information on how to set CLASSPATH, refer to Setting Environment Variables.
Testing a Connection to a Reality Database
Once you have installed and configured the SQL/JDBC software, you should check that you can connect to a Reality database. On Windows, the installation procedure places a shortcut to a program called RealJTest on your desktop. In UNIX, you can run RealJTest by entering the command java RealJTest.

Enter the following information:
· The network name of the host system containing the Reality database.
· The name of the database (defined in a Reality routing entry on the host).
· The user-id and password of a user on the host system.
· The name of a account on the Reality database. If this account has a password, enter the password.
When you have entered all this information, click the Connect button. The title of the Connect button should change to Disconnect and the connect string should be displayed beside the Disconnect button.
Once you are connected, you can enter SQL statements into the Command text area. When you click the Execute button, these will be executed and the results displayed in the Results text area.
If Reality transaction handling is enabled, you can create and populate two small test tables, STAFF and CARS, by selecting the Create Test Tables command from the Database menu. The Recent drop down combo box will be populated with a small number of pre-defined SQL queries for you to try out. The tables may be deleted by selecting the Delete Test Tables command.
WinSQLM
· Create a new SQL table definition for an existing Reality file.
· Open an existing table definition.
· View and update column definitions.
· View and update index definitions.
· View and update privileges.
· View and update table information and allow/disallow table updates.
· View source file information.
· Test the ODBC connection.
Prerequisites
· Refer to the Reality Release Information for details of which versions of Windows are supported.
· PCSNI software V2.2 Rev C or later.
· If you are connecting to a Reality database on a UNIX host, the host will require UNIX-Connect.
Installing WinSQLM
· Start the installation program as described for Windows in the section Starting the Installation.
· Select WinSQLM from the SQL Software menu.
· The default location is c:\Program Files\MDIS\WinSQLM; you can override this if required.
RealWeb
RealWeb allows the Reality DataBasic programmer to develop Web pages using data held in a Reality database. It consists of a set of Java servlets that run on a web server and a DataBasic API for constructing HTML pages.
The RealWeb API provides a suite of subroutines that the DataBasic programmer can use to interface to the Web browser – that is, to access arguments passed as part of the URL and to construct the HTML page that will be returned to the browser. Routines are provided to do the following:
· Fetch the values of arguments passed to RealWeb by the browser.
· Start and end an HTML page.
· Format text in various ways – for example, as a heading; left, centre or right aligned; fixed-pitch; in a particular font size and colour.
· Insert a horizontal rule.
· Create a hyperlink.
· Create an HTML form containing push buttons, text boxes and drop down lists.
· Create a definition list.
· Fetch and manipulate cookies.
Prerequisites
· A web server with support for Java servlets. (This can be on the same host as the Reality database or on another host.) On web servers that do not support servlets, plug-ins can be used to add servlet support.
· Java Run Time Environment (JRE) version 1.2 or above. If this is not available, it can be downloaded from Sun’s Java web site (http://java.sun.com/j2se/).
· If you are connecting to a Reality database on a UNIX host, the host will require UNIX-Connect.
Information You Must Supply
The table below lists the information you will need when installing RealWeb. You can fill in the second column of the table so that you have the information to hand during the installation process (print out this page if you are viewing it on-line).
|
The location of the directory on your web server or servlet plug-in where servlets are stored (the servlet directory) – refer to your web server or plug-in documentation. |
|
|
The location of the document root directory of your web server – refer to your web server or plug-in documentation. |
|
|
root password if installing on UNIX. |
|
Set-up Before Installation
Servlet Plugins
If your web server does not support servlets, install a servlet plugin, such as JRun. This can be purchased from Adobe (http://www.adobe.com/products/jrun/).
Netscape Enterprise Server
If you are using the Netscape Enterprise Server, you will need to do the following:
· Create a directory called servlet in your web server’s document root Directory (the path will be something like /usr/netscape/server4/docs/servletif you use the default installation settings).
· Create a file called realweb.ini in the web server’s configuration directory. This will be a directory called https‑ServerName/configin the server root directory, where ServerName is the name of your web server.
Java 1.2
The servlets require the Java Run Time Environment (JRE) version 1.2 or above. If this is not available, it can be downloaded from Sun’s web site (http://java.sun.com/j2se/).
Sun hosts used as web servers may need Solaris patches in order to run JRE 1.2. These patches are listed on, and may be downloaded from the above Web site.
The Reality installation CD includes readme.txt files for several of the client components.
Installation
Windows
· Start the installation program as described for Windows in the section Starting the Installation.
· Select RealWeb Servlets & HTML Install from the Web Software menu.
· If you have not already installed JReal, this is loaded automatically.
· The destination for the RealWeb servlets must be your servlet directory (see Information You Must Supply).
· The destination for RealWeb’s HTML files must be your web server’s document root directory (see Information You Must Supply).
UNIX
· Start the installation program as described for UNIX in the section Starting the Installation.
· Enter the root password when prompted. The following menu is displayed:
Reality CD-ROM Component Installation Utility
The following components are available
JDBCdriver V1.0 RealSQL-JDBC driver interface to
Reality
JReal V3.2 Java interface to Reality (DDA &
RSC)
RealWeb V3.2 Web interface to Reality
Select component to install
· Press RETURN until you are prompted to install RealWeb; then enter y.
Note: JReal is a prerequisite for RealWeb. When you select RealWeb, JReal is included automatically.
You are then prompted
About to install ......... Confirm?
Enter y to continue.
· Enter the installation directory for each component when prompted. For JReal, the default location is /usr/northgateis/Product-Version, but you can change this if required. The destination for the RealWeb servlets must be your servlet directory and that for RealWeb’s HTML files must be your web server’s document root directory (see Information You Must Supply).
Set-up After Installation
· Add the jreal.jar file to CLASSPATH. For example, on UNIX:
/usr/northgateis/JReal-3.1/class/jreal.jar
or on Windows:
C:\Program Files\NorthgateIS\JReal-3.1\jreal.jar
· Add the class directory to CLASSPATH.
On UNIX:
/usr/northgateis/JReal-3.1/class
On Windows:
C:\Program Files\NorthgateIS\JReal-3.1\class
This contains the reality.properties file.
For information on how to set CLASSPATH, refer to Setting Environment Variables.
RealWeb User-id
Log on to the SYSMAN account and run SSM. Then do the following:
· Use SSM option 2 to set up a user-id that will be used to access RealWeb. Set the status (field 13) to ’E’ (enabled) and the type (field 14) to ‘S’ or ‘*’ (so that it can be used as a server). Note that on a UNIX host a corresponding UNIX user-id must also exist, and it is the password for the UNIX user-id that must be used when running the RealWeb configuration editor (see Setting up the Servlets).
· Use SSM option 3 to configure the security profiles associated with these user-ids, setting field 8 to specify an alternative security profile to be used when logged in via the RealWeb server, RWSRVR. You can specify DEFAULT.REALWEB as this alternative profile, or you can set up a new security profile, based upon DEFAULT.REALWEB, to be used with the RealWeb user-id. For more information on client access security, refer to the Reality on-line documentation.
Setting up the Servlets
1. Start the RealWeb configuration Servlet by typing the following URL into a Web browser:
http://ServerName/servlet/rwconfig
where ServerName is the DNS name of your Web server. If this fails to generate the configuration editor front screen then it may require the web server (and/or the servlet plug in) to be stopped and re-started to recognise the configuration change.
2. Once the configuration servlet’s front screen is displayed, select New and click Submit.
3. Enter the details of how to connect to the database to be used (you can obtain help by clicking the Help button). The section name is the name that will be used in the URL to access the database. Create an entry to use the ENGLISH-TUTORIAL account so that the demonstration can be run.
4. Test the new ENGLISH-TUTORIAL section by typing the following URL.
http://ServerName/servlet/reality/SectionName/RW.DEMO
where ServerName is the DNS name of your Web server and SectionName is the name of the connection you have just created. This should result in the demonstration front page being displayed. If the message
RealWeb error: Missing entry in ini file
is displayed, either you have typed the section name wrongly, or something is missing from the section’s configuration. Refer to the RealWeb online documentation.
Upgrading to a New Version
When upgrading from RealWeb 2, you must first remove the directory com/northgateis (on UNIX), or com\northgateis (on Windows) and all its contents from the web server’s servlet directory.
Remote Tape Server
The Remote Tape Server provides the means of saving and restoring Reality data on remote tape drives.
Prerequisites
Any UNIX or Windows host that supports Reality.
Installing the Remote Tape Server
The remote tape server provides the means of saving and restoring Reality data on remote tape drives. The server software can be installed on any host (UNIX or Windows) that supports Reality. However, the tape server host does not itself have to have Reality installed.
1. Start the installation program as described in the appropriate section of Starting the Installation.
2. On a UNIX host, select option e, Install Remote Tape, from the top level Installation Menu.
On a Windows host, select Remote Tape from the Core Reality Software Menu.
3. On a UNIX host you are prompted for a user-id under which to run the remote tape server.
Caution
Using root is not recommended, because this could allow the remote tape server to overwrite any file on the server (including system files).
Upgrading to a New Version
If you are upgrading from Reality V9.0 to V14.0, you will need to reinstall the Remote Tape server on all hosts that provide this service. This is to ensure that the server uses the correct port.
Reality Web Services
Prerequisites
· A web server with support for Java servlets (Jetty is supplied).
Note: Reality Web Services have been tested on Jetty 5.1.4 and Tomcat 5.0.
· Java Runtime Environment (JRE) or Java Development Kit (JDK), version 1.4.1_02 or later. For Jetty, you can use either; for Tomcat you must use a JDK.
Set-up Before Installation
Before installing Reality Web Services, you must set the JAVA_HOME environment variable to the path of your JRE or JDK. For information on how to set JAVA_HOME, refer to Setting Environment Variables.
Installation
Windows
Before installing Reality Web Services, you must close down all other applications, including any anti-virus software.
1. Log on to Windows as an administrator.
2. Insert the second Reality CD in the drive and run SETUP.EXE. Follow the prompts to install Reality Web Services.
Note: If you deselect the Jetty Container option, you will be prompted to enter the path to your web server.
UNIX
1. Log in using the root/superuser user-id.
2. Confirm that the partition has enough space for the new release. You will need about 100Mb.
3. Load the second Reality CD into the drive.
4. Mount the CD as described in Mounting a CD on UNIX.
5. Run the installation procedure by entering:
./webservicessetup
Follow the prompts to install Reality Web Services.
Note: If you answer n when asked whether to use Jetty as your web server, you will be prompted to enter the path to your web server.
Set-up After Installation
Jetty Web Server
To start and stop the Jetty web server, do the following:
Windows
· To start Jetty, select Reality Web Services | Start Jetty from the Start menu.
· To stop Jetty, select Reality Web Services | Stop Jetty.
UNIX
To start Jetty, do the following:
1. Log in using the root/superuser user-id.
2. Enter the following:
#cd
/usr/northgateis/jetty5.1.4
#java -jar start.jar
To stop Jetty, enter the following:
#cd
/usr/northgateis/jetty5.1.4
#java -jar stop.jar
DataBase Configuration
Each database that will expose DataBasic subroutines must be set up as described in the Reality on-line documentation.
Remote Basic ActiveX Control
The Remote Basic ActiveX Control is a component that can be used in Visual Basic programs running on a PC to run Remote Basic subroutines on a Reality database. For details of how to use the Remote Basic ActiveX Control, refer to the Reality on-line documentation.
Prerequisites
· Refer to the Reality Release Information for details of which versions of Windows are supported.
· PCSNI software V2.2 Rev C or later.
Installation
1. Start the installation program as described for Windows in the section Starting the Installation.
2. Select Remote Basic ActiveX Control from the Core Reality Software menu.
3. The default location is C:\Program Files\NorthgateIS\Reality Remote Basic ActiveX Interface; you can override this if required.
Set-up After Installation
To call a Remote Basic subroutine, you must establish a connection to an account on a Reality database – you will need to use a user-id that has been set up as follows.
Log on to the SYSMAN account and run SSM. Then do the following:
1. Use SSM option 3 to create a security profile to be used with the Remote Basic server. It is recommended that this profile should have field 23 (Remote Basic) set to R (restricted); you must also specify a file in which the subroutines that can be called remotely are listed. For more information on client access security, refer to the Reality on-line documentation.
2. Use SSM option 2 to set up a user-id that will be used to access Remote Basic subroutine. Set the status (field 13) to ’E’ (enabled) and the type (field 14) to ‘S’ or ‘*’ (so that it can be used as a server). Note that on a UNIX host a corresponding UNIX user-id must also exist, and it is the password for the UNIX user-id that must be used when establishing a connection.
3. Use SSM option 3 to configure the security profile associated with the user-id you have created, setting field 8 (Alt Server Profiles) to specify that the Remote Basic server (RBSRVR) should use the security profile you created in step 1.
Appendix A – Setting Environment Variables
· On Windows 2000, Server 2003 and XP, environment variables can be set by right clicking on My Computer and selecting properties. Select the Advanced tab and then select Environment or Environment Variables.
Note: Quotes (“) are not needed even if the path includes spaces.
· On UNIX, an environment variable can be set in .profile using a line like:
variableName=path;export variableName
For example, to set the variable CLASSPATH:
CLASSPATH=.:/usr/northgateis/JReal-3.1/jreal.jar:/usr/northgateis/RealSQL-JDBC-1.0/realsql-jdbc.jar;export CLASSPATH
To set multiple paths, separate them with colons as shown above.
Note: When using RealWeb, the web server/servlet plug-in may have specific mechanisms for adding JReal into its CLASSPATH. The readme.txt file supplied with JReal tells you how to do this for JRun.
Appendix B – Mounting a CD on UNIX
· On Solaris the CD is normally automatically mounted to the /cdrom/cdrom0 directory.
Note: If the CD is not automatically mounted, it can be mounted manually using:
mount –F hsfs –r /dev/sr0 /cdrom
· On other hosts, create a mount point using:
mkdir –p /mnt/cdrom
then:
q On AIX manually mount the device 0 CD using:
mount -vcdrfs -oro /dev/cd0 /mnt/cdrom
q On Linux, manually mount the CD using:
mount /dev/cdrom /mnt/cdrom
Once the CD is mounted, you can change directory to the mount point:
cd /cdrom/cdrom0 (Solaris)
cd /mnt/cdrom (other hosts)